Showing posts with label Food. Show all posts

Monday, October 7, 2013

The Very BEST Apple Crisp


Autumn is my favorite time of year! And after a busy September filled with beautiful weddings and an amazing vacation spent in Tuscany, Italy, to celebrate our second anniversary, the Mr. and I are just now embracing the change of seasons in New York.

Friday evening, I stopped at Whole Foods on my way home from work to pick up a few things for dinner. As I entered, the produce section was overflowing with apples and my craving for apple crisp set in immediately.

I had come across this recipe, on another blog I occasionally read, so decided to try it out. The combination of brown butter, vanilla bean and bourbon intrigued me... Which I now realize, are the secret ingredients! As the dessert baked, the sweet smell of the fruit and spices perfumed our entire apartment.

I hardly got the finished crisp completely out of the oven before both the Mr. and I took a spoonful. Our real serving was topped with a heaping scoop of ice cream, of course.

I have to laugh now because we ate this treat so fast, I didn't even have time to snap a picture. Hence the reason for not including any in this post. I guess this really is 'The Best Apple Crisp You'll Ever Have'!

Enjoy!

*Image via Pinterest

Monday, July 15, 2013

The Buckeye State Ice Cream

Wedding celebrations were in full swing this weekend, as one of my dear friends from college got married. We attended undergrad at Miami University in Ohio, and are among just a handful of classmates currently living in New York City. Therefore, the evening's festivities turned into quite the reunion of classmates and sorority sisters I hadn't seen for some time!

As a tribute to our days spent in Oxford, I wanted to share a beloved ice cream from the Buckeye State! Jeni's Splendid is my absolute favorite ice cream. Scoop shops are located only in Ohio, but fortunately, pints of her frozen treats are available nationwide at fine grocery stores. There is even a cookbook, so ice cream lovers can make the signature flavors at home.

The Buckeye State Ice Cream is a combination of rich, peanut butter and dark chocolate. It's abundantly decadent, but not too sweet... Enjoy!


The Buckeye State Ice Cream
2 cups whole milk
1 tablespoon plus 1 teaspoon cornstarch
1 1/2 ounces (3 tablespoons) cream cheese, softened
1/2 cup unsalted natural peanut butter
1/2 teaspoon fine sea salt (less if using saltier peanut butter)
1 1/4 cups heavy cream
2/3 cup sugar
2 tablespoons light corn syrup
2 tablespoons honey
4 ounces chocolate (55% to 70% cocoa), chopped

Prep
Mix about 2 tablespoons of the milk with the cornstarch in a small bowl to make a smooth slurry. Whisk the cream cheese, peanut butter, and salt in a medium bowl until smooth. Fill a large bowl with ice and water.
Cook
Combine the remaining milk, the cream, sugar, corn syrup, and honey in a 4-quart saucepan, bring to a rolling boil over medium-high heat, and boil for 4 minutes. Remove from the heat, and gradually whisk in the cornstarch slurry. Bring the mixture back to a boil over medium-high heat and cook, stirring with a heatproof spatula, until slightly thickened, about 1 minute. Remove from the heat.  
Chill
Gradually whisk the hot milk mixture into the cream cheese mixture until smooth. Pour the mixture into a 1-gallon Ziploc freezer bag and submerge the sealed bag in the ice bath. Let stand, adding more ice as necessary, until cold, about 30 minutes. 
Freeze
Pour the ice cream base into the frozen canister and begin to spin the ice cream. 
Meanwhile, melt the chocolate in a double broiler. Remove from the heat and let cool until tepid but still fluid. When the ice cream is thick and creamy and almost finished, drizzle the melted chocolate slowly through the opening in the top of the ice cream machine and allow it to solidify and break up in the ice cream for about 2 minutes. 
Pack the ice cream into a storage container, press a sheet of parchment directly against the surface, and seal with an airtight lid. Freeze in the coldest part of your freezer until firm, at least 4 hours.

Wednesday, June 26, 2013

Homemade Almond Milk


Non-dairy milks, such as soy, rice, coconut, hemp, oat and almond are growing in popularity.

These plant-based alternatives are easier for the body to digest, compared to cow’s milk, as they don’t contain lactose. And, some even have added health benefits. For example, almond milk, is high in Vitamin E, Magnesium and Potassium.

While you can purchase milk substitutes at nearly any grocery store, I prefer to make my own. The end result is smooth, silky and just a touch sweet.


Ingredients
1 Cup Raw Almonds
3 Cups Filtered Water
¼ Teaspoon Coconut Oil
¼ Teaspoon Pure Vanilla Extract

Equipment
Blender (Vitamix)
Nut Milk Bag (or cheesecloth)

Place the raw almonds in a small bowl and cover with filtered water. Soak the almonds for at least 6 hours, or overnight. The longer the almonds soak, the creamier the milk. When done soaking, drain and rinse the almonds under cold water. Add the almonds to the blender, along with 3 cups filtered water. Blend on high speed for 2 minutes. Turn off the blender, add ¼ teaspoon coconut oil and ¼ teaspoon pure vanilla extract. Pulse just to combine.

Over a large bowl, pour the contents into the nut milk bag. Twist the bag tightly, and gently press all the milk from the almond meal (the almond meal will be dry and remain inside the bag).

Store the almond milk in a tightly sealed container for up to 3 days. But believe me, it won’t last that long! I love to mix this milk into fruit smoothies and it’s delicious with Cold Brew Coffee.


Monday, June 24, 2013

Slow-Bake Kale Chips

Hello, friends... Wow, I’ve missed you guys! It's been way too long since we've chatted on Ella Modern, and for that, I apologize. The past couple months have flown by so fast, that I can't believe summer is already in full swing! I've got so much to share, so let's jump right back in.

One of my favorite things about our neighborhood this time of year are the weekend Greenmarkets. Stands are set up all along Greenwich Street, showcasing beautiful flowers, fresh fruits and vegetables and there's even fresh fish... but only for the early risers, it sells so fast. 


Greens were in abundance this weekend, so I picked up a giant bunch of Tuscan Kale. I love to use kale for salads because it's a little heartier than ordinary lettuce (and, I highly recommend trying THIS recipe). For something more savory, I also like to make Kale Chips. Yes, that's right, Kale Chips.

I've tried several different recipes, but Gwyneth Paltrow's slow-bake rendition is by far the best, and ensures a crispy chip!

Ingredients
1 Bunch Tuscan Kale, Chopped Into Bite Size Pieces
Olive Oil
Sea Salt

Preheat the oven to 200 degrees F. Lightly drizzle the kale with olive oil and toss to coat. Spread kale on a sheet pan in a single layer (you may have to use two sheet pans). Sprinkle with sea salt.  Bake for 1 hour until lightly browned and crisp.

Enjoy!

Tuesday, February 5, 2013

Valentine's Day Baking Essentials

I can always justify a reason to bake, especially on Valentine's Day! While I'm still finalizing exactly what I'll be making for the Mr :) ... Rest assured, it will involve LOTS of chocolate. So, as I continue to ponder and flip through cookbooks, here are a few of my favorite kitchen tools for homemade and love-filled sweet treats. Enjoy!
Heart-shaped cookie cutters are essential for making these yummy treats: conversation hearts.

Who else loves red velvet cupcakes?

Share your recipes with a friend on cute cards like these.

Stay organized by pre-measuring ingredients into latte bowls.

There's nothing wrong with having an apron collection. 

How to write... on a cake, or plate.

Gourmet doughnuts make for a perfect Valentine's Day breakfast. 

Decorating desserts with sugar and sprinkles is the best part of baking!

Cookbooks from pretty pastry shops are charming.

Last but not least... Williams-Sonoma is my "go to" for all cooking essentials... Like my bright red spatulas.

Thursday, November 15, 2012

Heirloom Tomato Tartine


The MAC Cosmetics corporate office sits in a beautiful brick townhouse on the corner of Prince and Wooster, arguably the prettiest stretch of cobblestone in New York City.

Therefore, without a doubt, one would think that working in SoHo is a dream come true. While there are a many, many, many more Pros to this location than Cons, there is one major Con: What's for lunch?

I know it sounds unbelievable, as almost every renowned chef has a restaurant within one square mile, but it's true! Finding a cup of soup, half sandwich or mixed green salad in this neighborhood is like finding a needle in a hay stack. While I wish it were the case, Jean-Georges can't make me lunch everyday.

To alleviate the stress of deciding what to eat at noon, I've opted to bring my own snacks. I've never been good at packing meals in the morning. Instead, I keep a few easy-to-prepare items in the fridge at work.

My favorite thing to make is an Heirloom Tomato Tartine. It's quick and easy, as well as healthy and inexpensive.

1 Slice Whole Wheat Bread, Toasted (I use Ezekiel 4.9)
Hummus (I use Whole Foods Original Hummus)
1/2 Cup Baby Heirloom Tomatoes, Sliced
1 Teaspoon Olive Oil
Salt/Pepper
Italian Parsley/Basil (Optional)

Slice a handful of Baby Heirloom Tomatoes and place in a small bowl. Toss with Olive Oil, Salt and Pepper, to taste. 

Spread hummus on a toasted slice of bread. Scoop tomato mixture onto the hummus and top with a sprinkling of fresh herbs.

Enjoy!


Friday, October 26, 2012

Creamy Pumpkin Breakfast Smoothie


When the weather starts to get chilly, I tend to crave everything pumpkin: soups, scones, pies and lattes... The list goes on and on! While wonderfully delicious, the unfortunate issue associated with this seasonal craving, is that often times the above mentions are mixed with cream, butter and sugar. (Insert big sigh... Ugh). Unhealthy to the utmost extent!

Over the past couple weeks, my Mom and I have both been trying to exercise a little more and eat a little better. Something that's easier said than done, for sure! (Insert another big sigh... Ugh). Remotely, we are holding each other accountable!

At one of my Mom's recent morning workout sessions, her instructor passed along a recipe for a healthy, pumpkin breakfast smoothie. As soon as I heard the basic ingredients, I couldn't stop thinking about ways improve the flavor and texture, while at the same time, maintain the nutritional benefits.

After a few attempts, I'm ready to share my favorite rendition. High in protein, low in sugar, and packed with everything healthy. Beware, you may never crave a Thanksgiving pastry again!

Creamy Pumpkin Breakfast Smoothie
6 oz. Vanilla 0% Greek yogurt (I like Chobani)
1/2 Banana, frozen (using a frozen banana will always improve the consistency of the smoothie)
1/2 Cup pumpkin puree, frozen if possible (be sure to use pumpkin puree and not pumpkin pie filling)
1/8 Teaspoon cinnamon, and just a pinch of nutmeg
2 Tablespoons applesauce
1 Scoop whey protein powder (I like Tera's Whey in Bourbon Vanilla or Plain Unsweetened)
1/3 Cup milk (Almond, Soy or Skim)
2 Tablespoons apple cider
1/8 Teaspoon agave nectar
3 Ice cubes

Mix all ingredients in a blender to desired consistency. If more liquid is needed, use apple cider or milk, depending on taste. This recipe should yield one large smoothie. Enjoy!

Tuesday, October 9, 2012

Salted Caramel Apple Pie

The best bakeries in the city have tiny, tiny storefronts and offer only a few sweet treats. Four and Twenty Blackbirds falls into this category. The Brooklyn shop sells only slices of (AMAZING) pie and coffee/tea... Nothing more.

The one exception: the earliest of risers may get their hands on a whole pie, if luck is in their favor. A limited number are made each day.

Not long ago, Four and Twenty Blackbirds shared their famous recipe for Salted Caramel Apple Pie. I've been wanting to make it ever since, and could think of no better occasion than Canadian Thanksgiving!

(The Mr. and I are very lucky to be able to celebrate this loving holiday twice each year!)

Earlier in the weekend, we ventured to the Tribeca Greenmarket to pick up fresh apples. For baking, the best varieties include: Crispin, Granny Apple and Cortland.


Now, let's get started...

The key to a good pie is a good crust. I've tried several variations and the best is Martha Stewart's rendition of Pate Brisee. The end result is soft and flakey, with the perfect amount of buttery richness.

Pressing the dough into a disc rather than shaping it into a ball allows it to chill faster. This will also make the dough easier to roll out.


I tend to like everything in small portions, so I chose to make several mini pies. While it's a little more time consuming to form each pie individually, I think it's a prettier way to serve this dessert.


Once the pastry dough is shaped nicely, it's important to layer the apples and caramel sauce in thirds. This allows the sweetness of the fruit and the saltiness of the candy to combine evenly.


The end result is almost too pretty to eat... Just kidding! It's best served with a heaping scoop of vanilla bean ice cream!

Tuesday, September 25, 2012

Shaved Fennel Salad with Arugula


Reading cookbooks is one of my favorite pastimes. There's just something about the chef's notes, beautiful pictures and different ingredient combinations that fascinates me.

Most of my browsing is done online, or, if I have a few minutes to spare, I enjoy flipping through the new hardcovers at Barnes & Nobles. Rarely, however, do I purchase a cookbook without first trying a recipe or two.

Most recently, I've had my eye on Heidi Swanson's release of "super natural every day". Up until this weekend, I had never actually tried one of Heidi's dishes; everything just looked, and sounded, so appealing.


On Saturday night, the Mr. and I decided to make a butternut squash risotto for dinner. To counter the richness of the rice dish, I also wanted to serve a lighter side, something other than mixed greens (which are always good, but I'm kind of bored with these days). I had found a recipe for a Shaved Fennel Salad with Arugula on Heidi's blog, 101 Cookbooks.

The recipe was very easy to make, and the contrasting flavors were delicious together! I highly recommend you give it a try. While I did adapt this version slightly from the original, it will surely be my "go to".

Shaved Fennel and Arugula Salad
1 medium-large zucchini, sliced into paper thin coins
2 small fennel bulbs, trimmed and shaved paper-thin
2/3 cup loosely chopped fresh Italian Parsley
1/3 cup fresh lemon juice
1/3 cup extra virgin olive oil
Kosher Salt
Fresh Ground Pepper 
4 or 5 generous handfuls arugula
Honey, if needed
1/2 cup pine nuts, toasted
1/3 cup feta cheese, crumbled


Combine the zucchini, fennel and Italian parsley in a bowl and toss with the lemon juice, olive oil and 1/4 teaspoon salt. Set aside and marinate for 20 minutes, or up to an hour.
When you are ready to serve the salad, put the arugula in a large bowl. Scoop all of the zucchini and fennel onto the arugula, and pour most of the lemon juice dressing on top of that. Toss gently but thoroughly. Taste and adjust with more of the dressing, olive oil, lemon juice, or salt if needed. If the lemons were particularly tart, you may need to counter the pucker-factor by adding a tiny drizzle of honey into the salad at this point. Let your taste buds guide you. Serve topped with pine nuts and feta.
Serves 4 to 6.


Monday, September 24, 2012

Lillet Blanc and Grapefruit


Vacation week has finally arrived and I couldn't be more excited! The Mr. and I are headed to Scottsdale, AZ, for several days of golfing, hiking and poolside relaxation at this beautiful hotel. We're pretty sure we'll be the only guests without grey hair, but are completely comfortable with that scenario. See, when you live in one of the biggest cities in the world, the only escape for true rejuvenation must be far away from densely populated ares (and filled with gorgeous spas)!

We don't leave until Wednesday, but this past weekend kicked-off our upcoming adventure to the Southwest. Some friends invited us to dinner on Friday night at Tacombi... We enjoyed life-changing tacos, seriously, go there!

And, later in the weekend, the Mr. and I played mixologist. We didn't want a margarita, but still wanted something citrus and refreshing. After a few different combinations, we perfected the Lillet Blanc and Grapefruit cocktail. This drink is very light and not too sweet; great on it's own or would be nice with a first-course at dinner.

In a cocktail shaker, mix 1 oz. Grey Goose vodka, 1 1/2 oz. Lillet Blanc and 2 1/2 oz. fresh squeezed grapefruit juice with ice. After a few shakes, strain the liquid into a martini glass and serve with a twist of orange. Enjoy!

Tuesday, September 18, 2012

Jean-Georges Vongerichten's Kale Salad


Kale is one of my absolute favorite vegetables! And, it just so happens to be in stylish abundance at many trendy New York restaurants. A few weeks ago, I tasted chef Jean-Georges Vongerichten's rendition of Kale Salad at ABC Kitchen. Also known as: the most delicious small plate of greens I've ever enjoyed! While some of the ingredients may seem surprising, the end result is a perfect combination of bright flavors.  

  • 4 tablespoons fresh juice and 1 tablespoon zest from 2 to 3 lemons
  • 1 tablespoon red wine vinegar
  • 1 small clove garlic, minced (about 1/2 teaspoon)
  • 1 anchovy filet, finely chopped
  • 1 tablespoon dijon mustard
  • 1 egg yolk
  • 1/4 teaspoon red chili flakes
  • 2 ounces Parmigiano Reggiano, grated on a microplane grater (about 2 cups)
  • 3/4 cup neutral oil (such as safflower or canola)
  • 1/2 cup plus 2 tablespoons extra-virgin olive oil
  • Kosher salt and freshly ground black pepper
  • 2 cups finely cubed sourdough bread
  • 12 ounces kale leaves, large stems removed, sliced into thin ribbons
  • 1/2 cup fresh mint leaves, sliced into thin ribbons
  • 1 serrano chili, thinly sliced

Combine lemon juice and zest, vinegar, garlic, anchovy, mustard, egg yolk, chili flakes, and cheese in the bowl of a food processor. Process until homogenous, about 10 seconds. With processor running, slowly drizzle neutral oil through feed tube, stopping the processor to scrape down sides as necessary until a smooth emulsion is formed, about 20 seconds.

Transfer to a medium bowl. Whisking constantly, slowly drizzle in 1/2 cup olive oil. Season dressing to taste with salt and pepper. Refrigerate until ready to use.

Heat remaining two tablespoons olive oil in a large non-stick skillet over medium heat until shimmering. Add bread cubes and cook, tossing and stirring constantly until golden brown and crisp, about 3 minutes. Transfer to a paper towel-lined plate and season with salt and pepper.

To serve, combine kale and mint in a large bowl with about 1/2 cup dressing (more or less as desired). Toss to coat well and let sit around 3 minutes. Transfer to a large serving bowl and top with croutons and sliced chilies. Serve immediately. Yields 4 servings. 

...

Kale Salad + Gorgeous Anniversary Roses = A Very Much Improved Working Lunch! 

Monday, August 27, 2012

Preserving Summer

I can't believe we're about to enter the very last week of summer. I'm just not ready to say good-bye to picnics in the park, morning farmer's markets and sundresses. Won't you please stay?

To counteract the reality of the changing seasons, I've been stocking up on excessive amounts of my favorite fresh herbs. Pestos, infused oils and homemade sauces lend themselves perfectly to "preserving summer".

Pesto is one of my favorite spreads to make because anything goes.

My rendition is a somewhat healthier take on a classic, as less oil and cheese is used. And, the baby arugula adds a nice spice. Believe me, there's no lack in flavor.

Monday, July 2, 2012

Sunday Supper:: Farro Risotto With Wild Mushrooms

Sundays are all about relxing and enjoying time at home before the start of a busy week. And, for me, it's the perfect time to try slightly more time consuming recipes that just aren't possible to make after a long day at work.

Many of these inspirations come from Martha Stewart's Cooking School. This is one of my favorite cookbooks because each dish is representative of a culinary technique, which Martha thoroughly explains to the 'at home chef'.

Today, the Mr. and I were in the mood for "healthy" comfort food, which, made it a great time to try risotto made with farro. Farro is an ancient Italian grain packed with many more nutrients than traditional rice and pasta. It's slightly chewey and has a very rich, nutty flavor.

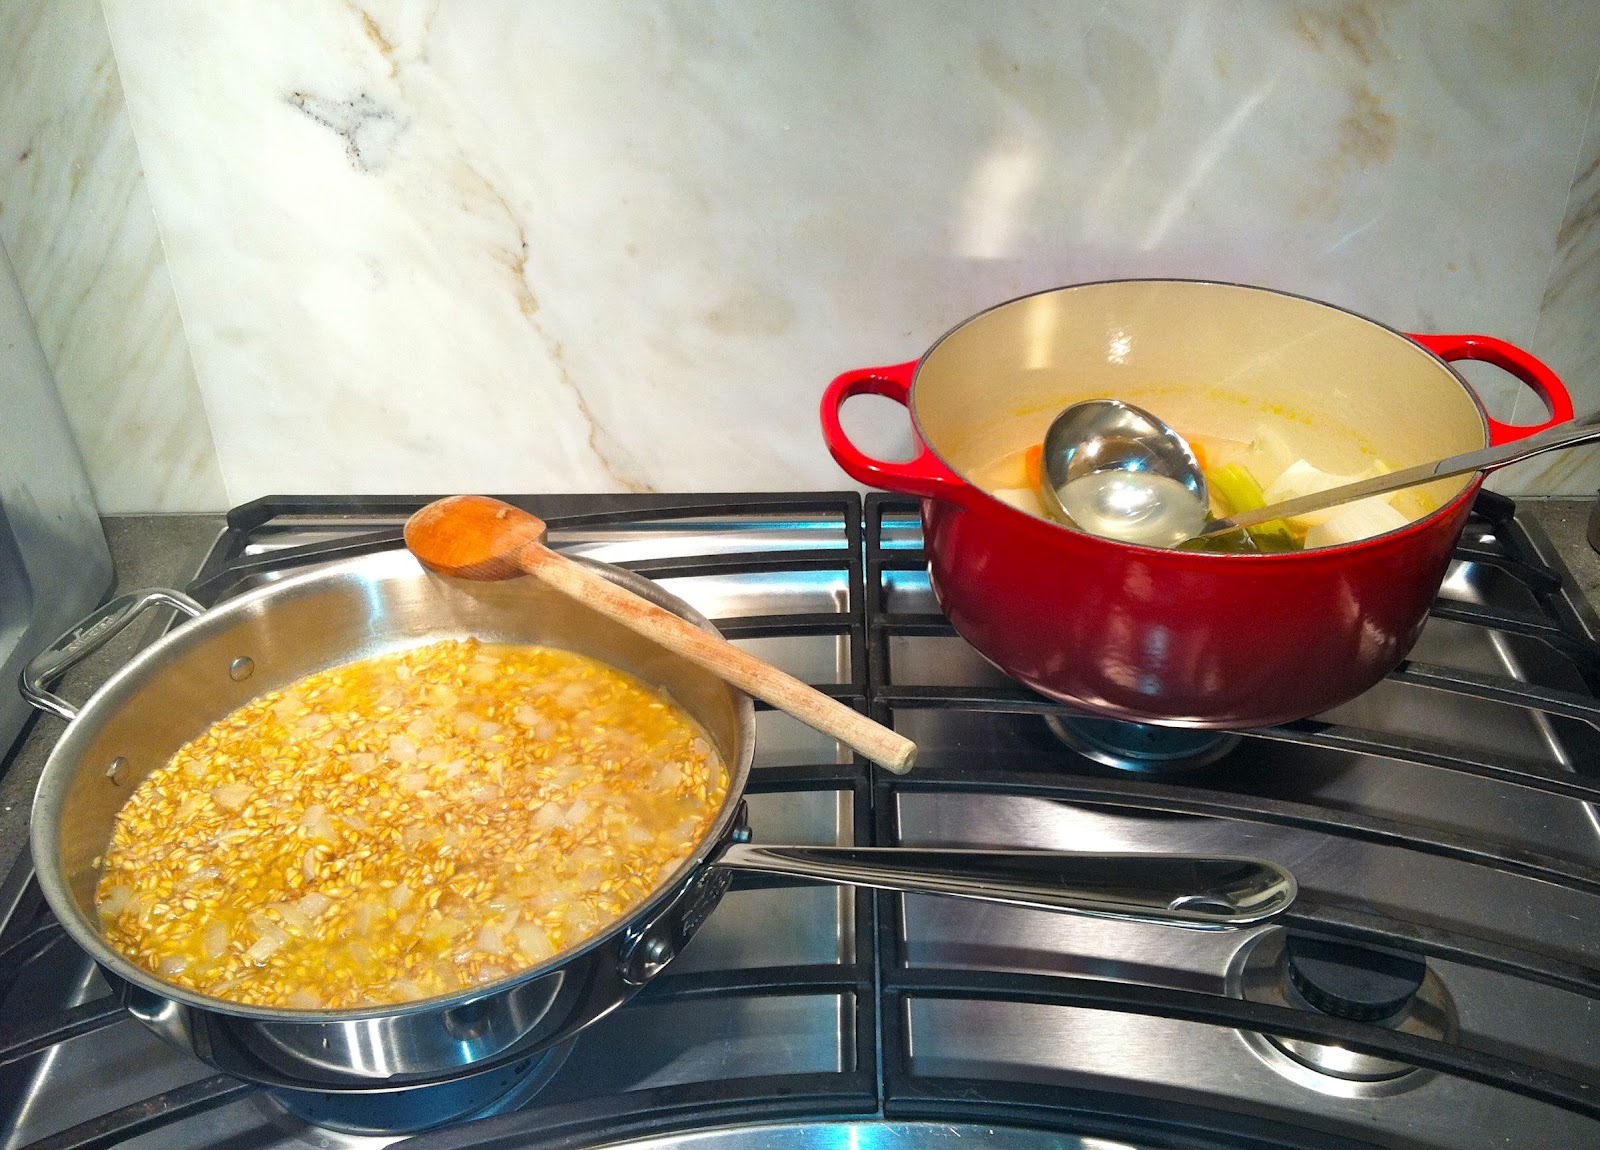
To start the recipe, I made a quick vegetable stock. If I've learned one thing from this book, it's to always make your own, and never use canned. For the stock, prepare:

1 celery stalk, cut in half lengthwise
1 medium carrot, cut in half crosswise
1/2 small onion, peeled
2 sprigs flat-leaf parsley
7 cups water

Combine stock ingredients in a 4-quart stockpot and bring to a boil over medium-high heat. Reduce heat and simmer for 15 minutes. Reduce heat to the lowest setting to keep stock hot, but not evaporating.


In another 4-quart pot, heat 3 tablespoons olive oil over medium high heat. Add 1/3 cup diced onion, and cook until transluscent, 1-2 minutes. Reduce heat if onion begins to brown. Add 1 cup farro to the onion mixture and cook for another two minutes.

Add 1/3 cup dry white wine to the pan, stirring just until absorbed. The farro should be glistening, but not dry. Using a ladle, add 1/2 cup hot stock to the rice. Stir constantly with a wooden spoon, at a moderate speed, until about three-quarters of the liquid is absorbed. Continue adding stock, 1/2 cup at a time, stirring frequently. This process should take 25 minutes, exactly.


When the farro has finished cooking. Add 2 tablespoons unsalted butter to the pan. Allow to melt. Then, stire in 1/2 cup grated parmigiano-reggiano cheese, 1/2 cup chopped flat-leaf parsley and salt and pepper, to taste.

Wednesday, June 27, 2012

DIY:: Spiced Cashew Milk

Before our wedding last year, I attempted the Blue Print Cleanse. And, to be completely honest, I wasn't very successful. By the end of Day 1, I found myself hungry, tired and irritable... Did I mention hungry?

While I probably won't ever be consuming six juices per day again, I was introduced to, and will continue to enjoy, the healthy deliciousness that is: cashew milk.


This sweet, yet satisfying beverage, is packed with vitamins and antioxidants. And, while I'm not on a raw, gluten-free, dairy-free nor vegan diet... It works with all of those!

Spiced Cashew Milk
2 cups raw cashews (soaked in water overnight)
4 cups filtered water
4-5 dates, pitted (soaked in water for about 5 minutes)
1/4 teaspoon cinnamon
1/4 teaspoon nutmeg
1/4 teaspoon cardamon (optional)

Place all ingredients in a high-speed blender (I highly recommend using a VitaMix) and blend until the cashews are pulverized. Let mixture sit for about 10 minutes. Pour mixture through a layer of cheese cloth and squeeze all the liquid into a bowl. Transfer milk to a glass jar or pitcher and store in the fridge for up to two days.

*Image via Roost

Monday, June 18, 2012

Lavender Lemonade


Hello, Monday. You're here so quickly, as most of my weekend was spent organizing closets and kitchen cabinets in our apartment. And while, to some extent, I find these chores somewhat therapeutic, it's shocking how long they take to complete, don't you all agree? So, as a little celebratory measure, I invited one of my closest friends over for a Sunday cocktail on the rooftop.

For a long time, I've wanted to attempt recipes with lavender. To me, it's such an elegant herb that seems to make every dish sound, and taste, very appealing.

Today was the perfect day... I decided to make not just any lemonade, but lavender lemonade. And, the result was divine.

{Lavender Lemonade}
I followed THIS recipe, and it couldn't have been easier. The only make-ahead step is preparing the lavender infused simple syrup. This adds the sweetness and floral essence to the lemonade. 

Lavender simple syrup can be used for a variety of other flavorings and serves as a nice hostess gift.

For the vibrant, purple color, be sure to add a drop each of red and blue food coloring. Otherwise, the syrup appears quite clear.

{Lavender Simple Syrup}

*Images via Sunday Suppers and Pease Pudding

Tuesday, May 29, 2012

Sweet Treat:: Root Beer Floats

Memorial Day weekend always reminds of going to the lake with my family. My sister and I would stand on the edge of the dock, and then jump in the water to see which one of us could brave the cold the longest (in Northern Minnesota, the ice usually melts in late-April, so that water is freezing!). Annie always won!

After our swim, we warmed up by the fire, roasting marshmallows and drinking root beer floats. They always tasted good!

Thinking about these memories made me realize how long it's been since I've made a root beer float. Who says you can't be a kid again, right?

{Photo via Lindsay Hunt}

Ingredients

  • 1 pint good, vanilla ice cream
  • 2 bottles very cold old-fashioned root beer (preferably Boylan's Root Beer)
  • Freshly whipped cream

Directions

Place a few scoops of vanilla ice cream into 2 tall float glasses. Pour the root beer over the ice cream and top with a dollop of whipped cream.

Thursday, May 17, 2012

Fresh Radishes with Butter and Sea Salt


I picked up some locally grown radishes at the Greenmarket in Union Square to make one of my favorite summertime hors d'oeurves: Radishes with butter and sea salt. This little plate is easy to make and pairs perfectly with a glass of wine on the deck.

To prepare, simply wash a handful of fresh radishes. Trim the greens and roots, and place the radishes over a bed of sea salt. (I use a small tray and sprinkle a very generous amount of sea salt to cover a portion of the the bottom). Whip one stick of unsalted, chilled butter, just until light and fluffy. Serve in a ramekin next to the sea salt and radishes.

To best enjoy, dip a radish first in the butter, and then the sea salt... And, you can't go wrong with a delicious slice of a french bread on the side.

Friday, May 11, 2012

Toasted Marshmallow Milkshakes

Every once in a while, I get a huge craving for a milkshake. And tonight was one of those times!

My husband and I have had a very busy week, so we were looking forward to enjoying an evening at home. I guess my sweet tooth, combined with a recipe I've wanted to try, and a relaxing night in with the Mr. made this dessert a reality.

The original Toasted Marshmallow Milkshake is from Stand4, a famous burger cafe in The Village. It's deliciously rich and has such a loyal following that the restaurant decided to release the recipe to Gourmet magazine. And, thank goodness they did!

Stand4 Toasted Marshmallow Milkshakes
4 scoops good quality vanilla bean ice cream or gelato
1 tablespoon milk, preferable whole milk
1 large dollop vanilla yogurt (to balance out the sweetness of the ice cream)
5 large marshmallows
Whipped cream (optional)
Chocolate squares (optional)


Toast marshmallows under a broiler in the oven (this only takes a couple minutes, so watch carefully!), until they are just evenly evenly toasted and dark, but not burnt.


Put the milk, yogurt and then ice cream in a blender. Blend just until combined.

Add three of the toasted marshmallows to the blender and whirl just until they are broken and evenly distributed. Do not over blend.


Pour shake into a glass, and top with the two remaining marshmallows and chocolate squares. Whipped cream is an added indulgence - go for it!


Serve with a straw, enjoy, and repeat if necessary (highly likely)!

Tuesday, March 27, 2012

5 Ingredients or Less... Curry and Fig Salmon


A few weeks back, I wrote about Pam Powell and her delicious line of natural, organic salad dressings available at Whole Foods. Take a look back at the post HERE!

I've tried, and love, every single one of them, but my absolute favorite is the Curry and Fig. It's sweet with just the perfect amount of spice. In fact I like it so much, I've started using it as a sauce on more than just veggies.

Last week, I was making pan seared salmon for the Mr. and me... One of our favorite dinners. I wanted to try something a little different, so drizzled the Curry and Fig dressing over the top of the fish, just before serving. The flavors complimented each other perfectly. I'm pretty confident in saying this is my new "go to" recipe. And, the best part is, only five ingredients are required. Enjoy!

Curry and Fig Salmon
Fresh Atlantic Salmon Fillets, Skin Removed
Salad Girl Curry and Fig Salad Dressing
Olive Oil
Salt
Pepper

Dry the salmon with paper towels to remove any excess moisture on the fish. Sprinkle with salt and pepper on both sides.

Heat 3 Tablespoons of Olive Oil in a non-stick frying pan over medium-high heat. When the oil is hot, place the salmon in the pan and cook for a couple minutes on each side.

Remove the fish from the pan and place in a serving dish. Drizzle the Curry and Fig dressing over the top of the salmon, according to taste.

For a little garnish, add some fresh Italian Parsley, as well.

Tuesday, March 20, 2012

Dinner Party Simplicity:: Mustard Roasted Fish


Last weekend, we hosted a dinner party and I was itching to try a new recipe. I had been eyeing Ina's Mustard Roasted Fish for a long time, but for some reason had never tried making it.

Since our gathering was the evening of "Spring Ahead" and we were experiencing unseasonably warm weather, I felt it would be the perfect main course for the occasion. Paired with steamed asparagus and herbed cous cous, obviously I couldn't go wrong.

What I liked most about this recipe (and to be honest, the entire menu), was that it could be prepared in advance of guests arriving. There's nothing worse than not attending to your company because you're slaving away in the kitchen preparing dinner.

I planned dinner for 7:30PM that evening. Ten minutes before that, I snuck away for the "oh so very last minute" preparations. I simply put the fish in oven for 8 minutes, ccooked the asparagus for 4 minutes, and heated my cous cous (which I had made beforehand).

The fish turned out wonderfully. In fact, we didn't even have leftovers! And for dessert, we had stewed fresh berries with vanilla bean ice cream. Simple and delicious.

Everyone asked for the recipe when they left. Therefore, a worthwhile blog post! Enjoy!